

Helm for Kubernetes - Basic Concepts
In this article, we'll cover the basic concepts of Helm — the package manager for Kubernetes — and how it turns collections of raw YAML manifests into versioned, reusable Helm charts. You'll see how Helm compares to apt, npm and pip, how a chart is structured, and how to build and install your first Helm chart on a local Minikube cluster with helm install.
Series — Helm for Kubernetes:
- Basic Concepts (you are here)
- Templates and Functions
- Managing Dependencies
What is Helm? The Package Manager for Kubernetes
Helm is a powerful package manager for Kubernetes that simplifies the deployment and management of applications on Kubernetes clusters. It allows developers and operators to define, install, and upgrade complex Kubernetes applications using simple configuration files called charts.
With Kubernetes, we usually define our applications using YAML files, which can become complex and hard to manage as the application grows. Each YAML file represents a Kubernetes resource, such as a Deployment, Service, or ConfigMap, and things like the order of creation and dependencies between resources can become cumbersome to handle manually. Helm addresses these challenges by providing a higher-level abstraction for managing Kubernetes applications.
When managing different versions of an application, Helm allows you to package your application into a chart, which can be versioned and shared. This makes it easy to roll back to previous versions if something goes wrong during an upgrade.
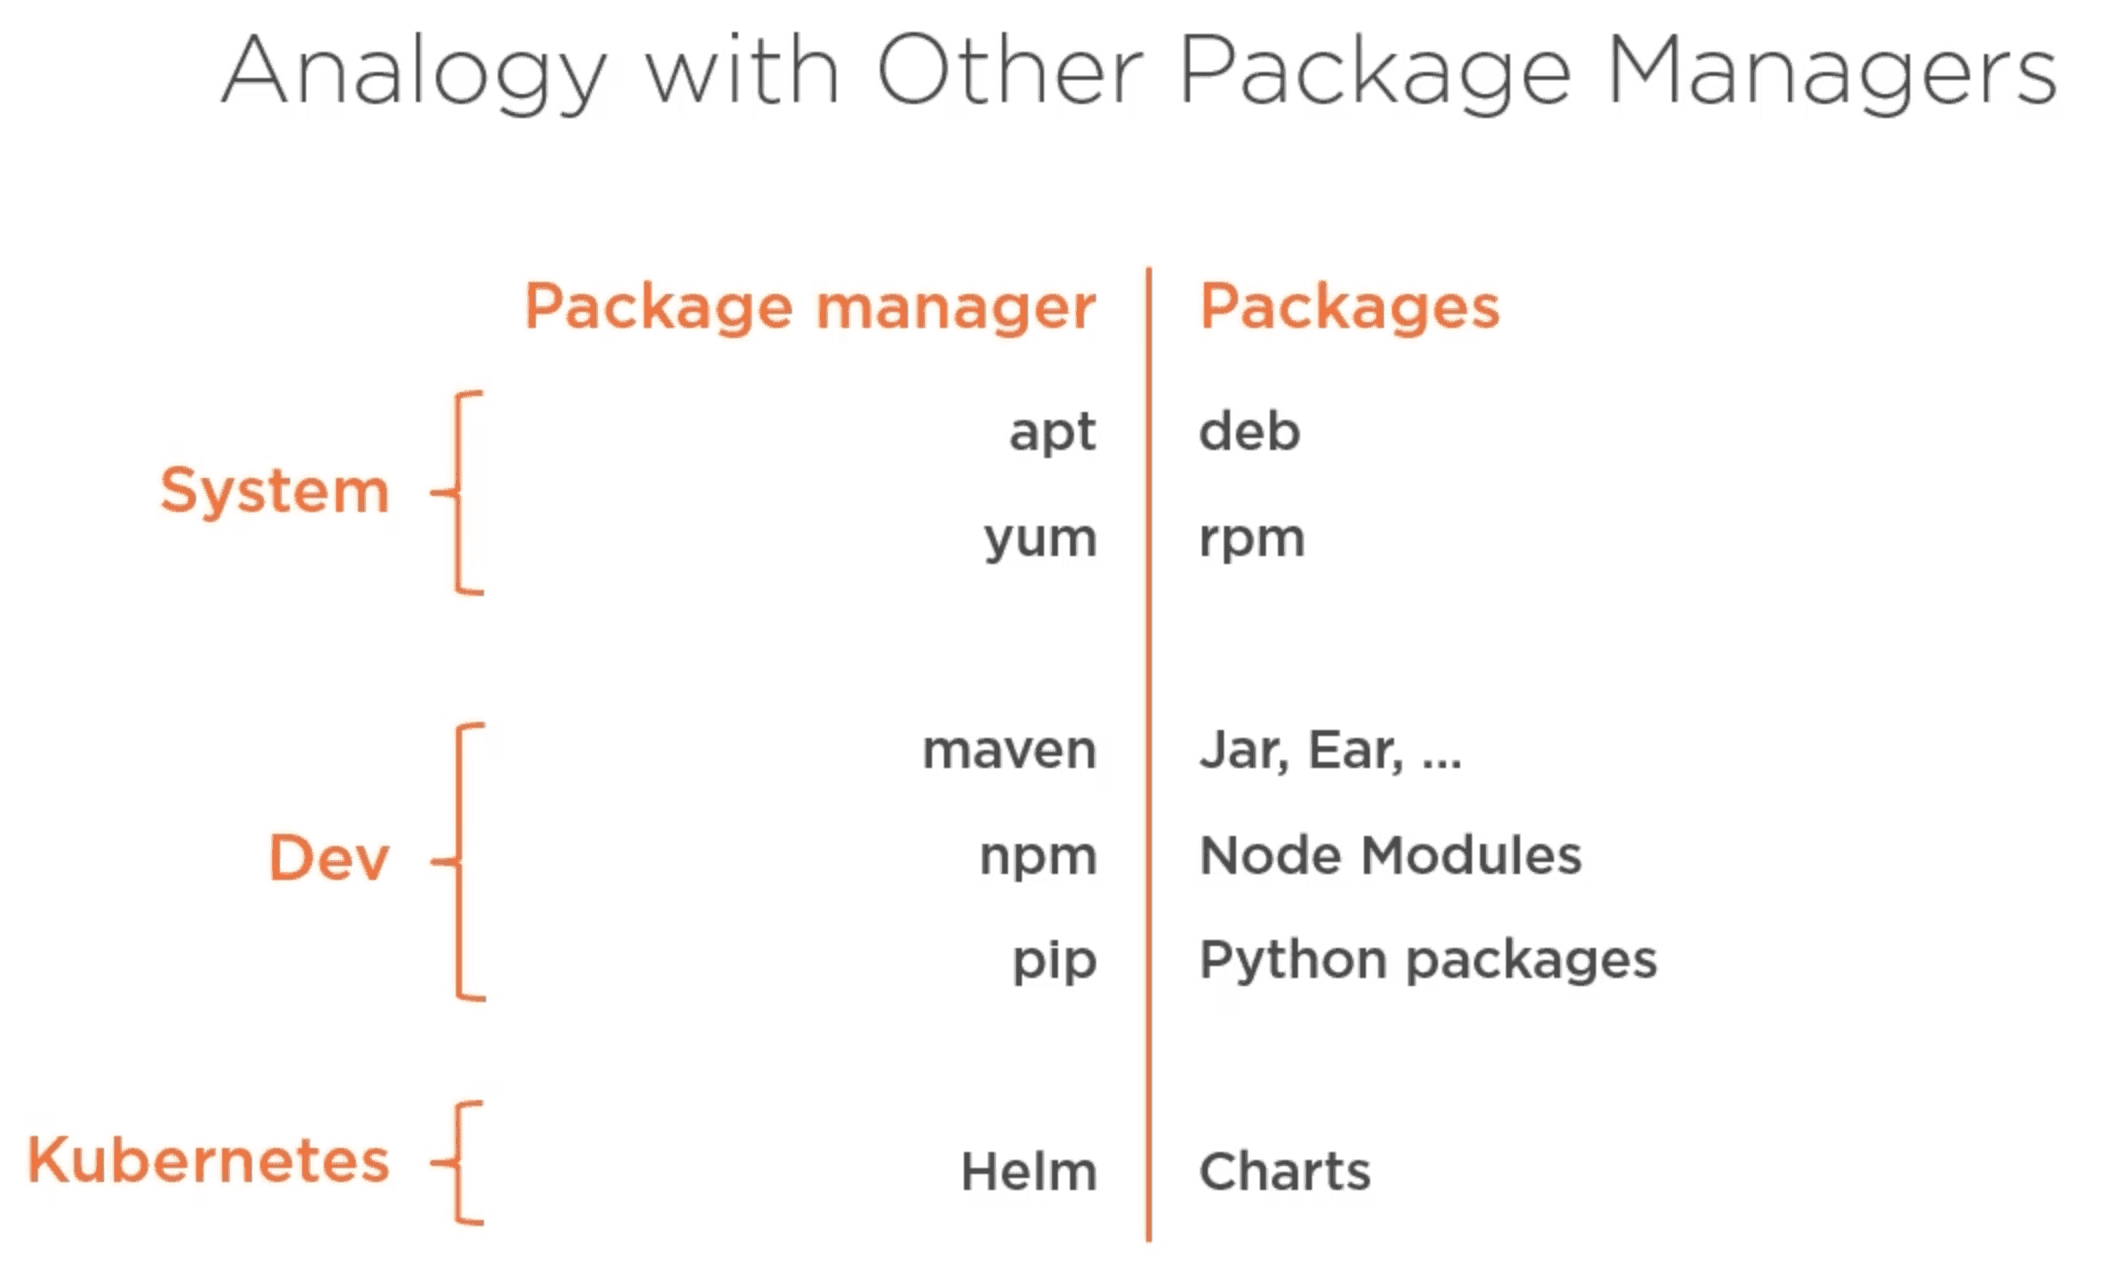
Making an analogy to other package managers, Helm is similar to package managers like apt for Debian-based systems or yum for Red Hat-based systems, maven for Java, npm for JavaScript, or pip for Python. Just like these package managers simplify the installation and management of software packages, Helm simplifies the deployment and management of applications on Kubernetes.
Installing Helm and Kubernetes Prerequisites
To work with Helm, we need Docker and Kubernetes installed as prerequisites:
For the purpose of this tutorial, we will also enable Ingress in Minikube, which allows us to expose our applications to the outside world. You can enable Ingress by running the following command:
minikube addons enable ingressNow we can install Helm:
And configure the default Helm charts repository:
helm repo add stable https://charts.helm.sh/stable
helm repo update
NOTE: the
stablerepository is deprecated and no longer maintained, but we will use it for the purpose of this tutorial. In a production environment, you should use the new Helm chart repositories, like Bitnami or Artifact Hub.
How to Build a Helm Chart: Structure and Files
Helm charts are the fundamental unit of packaging in Helm. A chart is a collection of files that describe a related set of Kubernetes resources. Charts can be used to deploy applications, services, and other components in a Kubernetes cluster.
Helm charts are stored in a directory structure that includes a Chart.yaml file, which contains metadata about the chart, a values.yaml file, which contains the default configuration values for the chart, and a templates directory, which contains the Kubernetes resource templates. The values.yaml file allows you to customize the behavior of your chart without modifying the templates directly. By default, the name of the folder is the name of the chart:
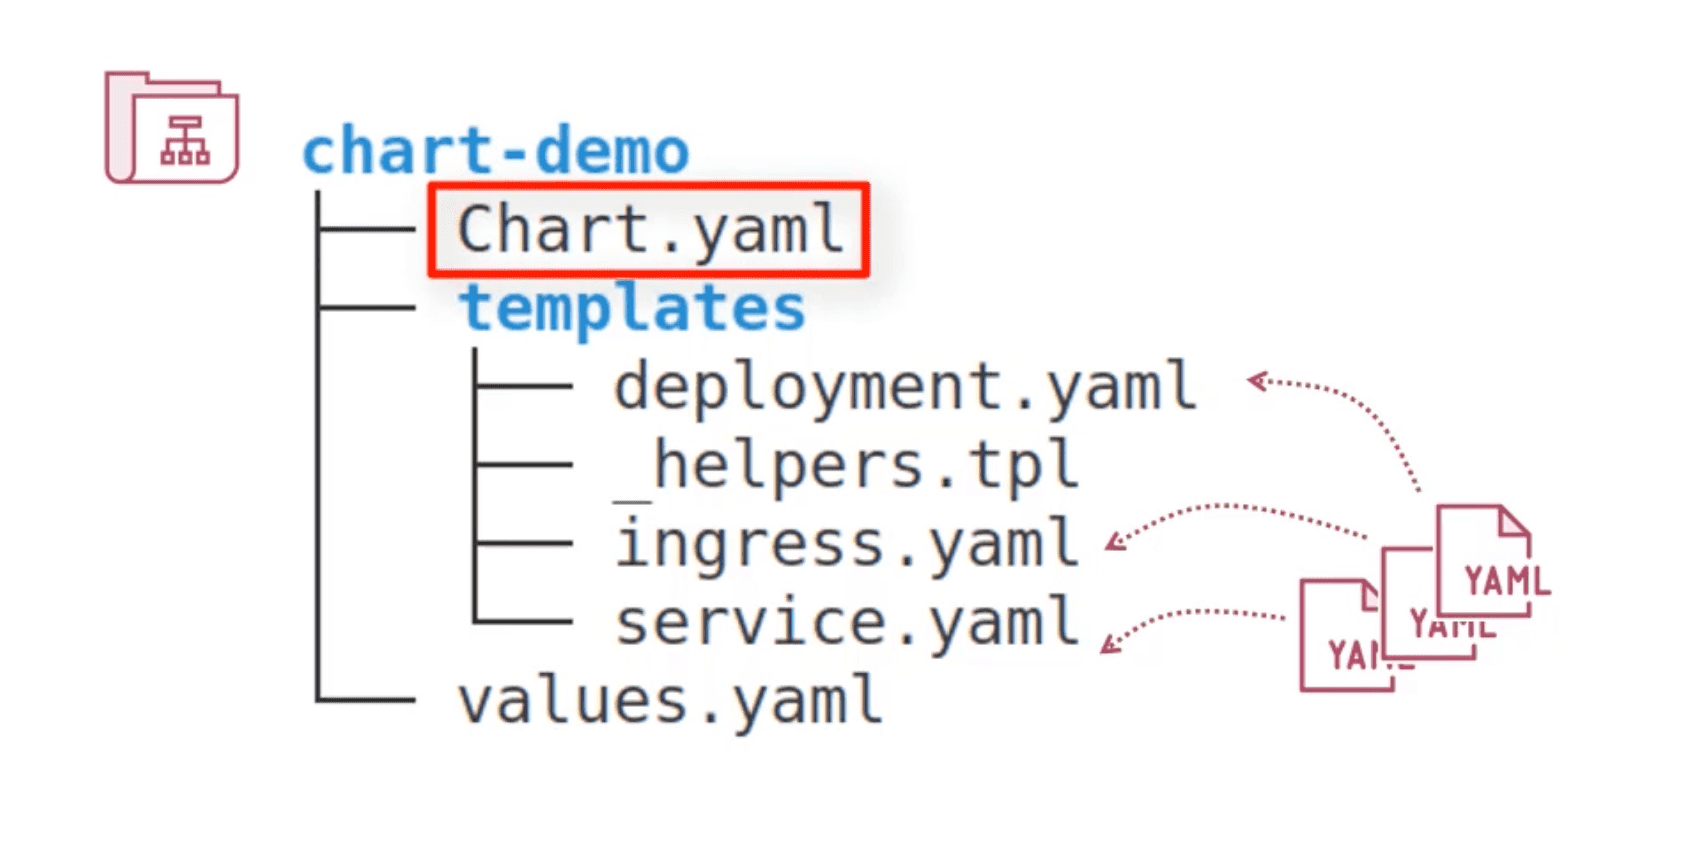
Chart.yaml: Helm Chart Metadata
The Chart.yaml file contains metadata about the chart, such as its name, version, description, and dependencies. Here is an example of a simple Chart.yaml file:
apiVersion: v2
name: my-application
description: A Helm chart for my application
keywords:
  - my-application
type: application
version: 0.1.0 # The version of the chart itself
appVersion: 1.3.12 # The version of the application being deployed
dependencies:
  - ...
First Example: A Helm Chart for a Web Application
As an example, let's create a simple Helm chart for a web application. We will create a new directory called my-web-app with a Chart.yaml file and a templates directory containing a deployment.yaml, a service.yaml file and an ingress.yaml file.
Execute the following commands to create the necessary files and directories:
mkdir my-web-app
cd my-web-app
touch Chart.yaml
mkdir templates
touch templates/deployment.yaml
touch templates/service.yaml
touch templates/ingress.yaml
Content of Chart.yaml:
apiVersion: v2
name: my-web-app
description: A Helm chart for my web application
type: application
version: 0.1.0
appVersion: 1.0.0
Content of templates/deployment.yaml:
apiVersion: apps/v1
kind: Deployment
metadata:
  name: app-frontend
spec:
  replicas: 1
  selector:
    matchLabels:
      app: app-frontend
  template:
    metadata:
      labels:
        app: app-frontend
    spec:
      containers:
        - name: app-frontend
          image: nginx:latest
          ports:
            - containerPort: 80
Content of templates/service.yaml:
apiVersion: v1
kind: Service
metadata:
  name: app-frontend-service
spec:
  selector:
    app: app-frontend
  ports:
    - protocol: TCP
      port: 80
      targetPort: 80
  type: ClusterIP
Content of templates/ingress.yaml:
apiVersion: networking.k8s.io/v1
kind: Ingress
metadata:
  name: app-frontend-ingress
spec:
  rules:
    - host: my-web-app.local
      http:
        paths:
          - path: /
            pathType: Prefix
            backend:
              service:
                name: app-frontend-service
                port:
                  number: 80
Installing a Helm Chart with helm install
To install the Helm chart we just created, we can use the helm install command. First, make sure you are in the directory where your my-web-app chart is located. Then run the following command:
helm install my-web-app ./my-web-appWe can also use --dry-run to simulate the installation and see what resources would be created without actually deploying them:
helm install my-web-app ./my-web-app --dry-runUmbrella Charts: Managing Multi-Component Apps in Helm
In Helm, an umbrella chart is a chart that contains other charts as dependencies. This allows you to manage multiple related applications or services as a single unit. Umbrella charts are useful for deploying complex applications that consist of multiple components, such as a frontend, backend, and database.
my-umbrella-chart/
├── Chart.yaml
├── values.yaml
├── charts/
│   ├── my-frontend-chart/
│   ├── my-backend-chart/
│   └── my-database-chart/


my-frontend-chart/
├── Chart.yaml
├── values.yaml
├── templates/
│   ├── deployment.yaml
│   ├── service.yaml
│   └── ingress.yaml

...
So installing the umbrella chart will install all the dependent charts as well, making it easier to manage and deploy complex applications.
helm install my-umbrella-chart ./my-umbrella-chartEssential Helm Commands Cheat Sheet
Helm provides a set of commands to manage charts and releases. Some of the most commonly used commands are:
helm install [RELEASE_NAME] [CHART]: Installs a chart and creates a new release.helm upgrade [RELEASE_NAME] [CHART]: Upgrades an existing release to a new version of the chart.helm rollback [RELEASE_NAME] [REVISION]: Rolls back a release to a previous revision.helm uninstall [RELEASE_NAME]: Uninstalls a release and removes all associated resources.helm history [RELEASE_NAME]: Displays the history of a release, including all revisions and their statuses.helm status [RELEASE_NAME]: Displays the status of a release, including its current revision, deployed resources, and any notes provided by the chart.helm get all [RELEASE_NAME]: Displays all information about a release, including its manifest, values, and hooks.helm list: Lists all the releases in the current namespace.
Related Reading
Continue with the rest of the Helm series and dive deeper into Kubernetes:
- Next in this series: Helm for Kubernetes — Templates and Functions — learn how to parameterize charts with
values.yaml, Go templates and Sprig functions. - Helm for Kubernetes — Managing Dependencies — package charts, publish them to a repository, and declare subchart dependencies in
Chart.yaml. - Kubernetes for Developers — Basic Concepts — the Kubernetes fundamentals Helm builds on.
- Kubernetes for Developers — Deployments and Replica Sets — the workload objects your Helm charts will most often render.
- Kubernetes for Developers — ConfigMaps and Secrets — configuration primitives you'll template from
values.yaml. - Docker for Web Development — Basic Concepts — the container foundations underneath every Helm chart.