
Kubernetes for Developers - Deployments and Replica Sets
In this post, we will explore how to use Deployments and ReplicaSets in Kubernetes to manage the lifecycle of your applications — including scaling, rolling updates, rollbacks, and zero-downtime releases. You'll see ready-to-use YAML manifests, probe configurations and the kubectl commands you need to manage Deployments in production.
Series — Kubernetes for Developers:
What are Deployments and Replica Sets in Kubernetes?
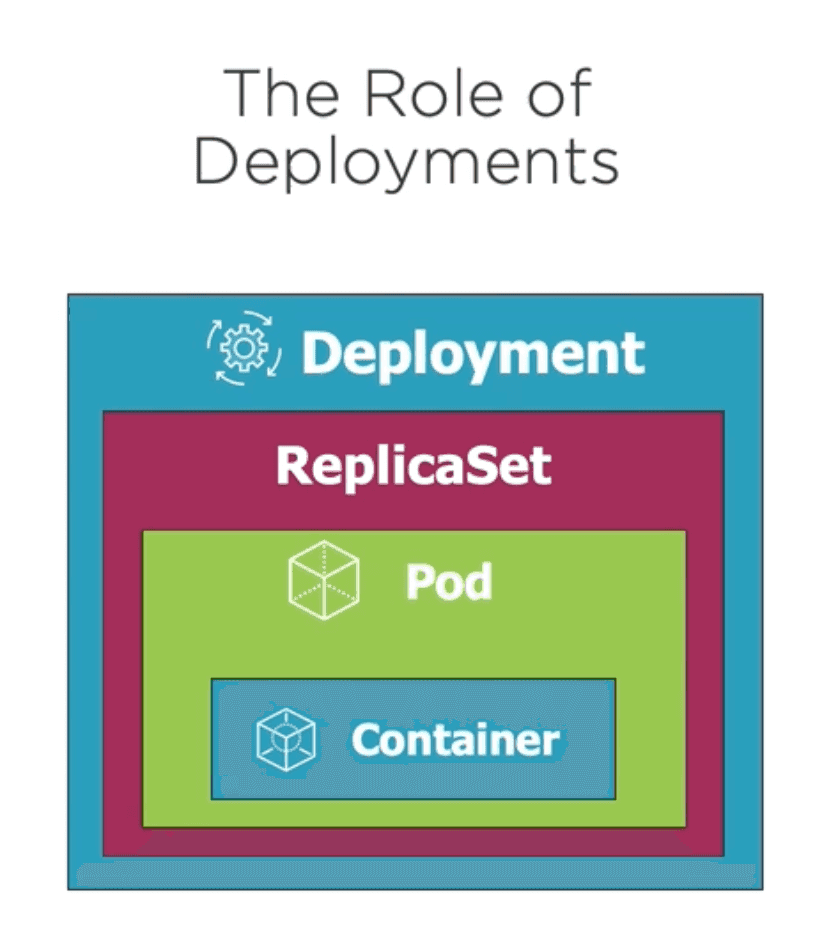
In Kubernetes, a Deployment is a higher-level abstraction that manages the lifecycle of applications. It provides declarative updates to applications, allowing you to define the desired state of your application and let Kubernetes handle the rest. Deployments are responsible for creating and managing Replica Sets, which in turn manage the pods. A Replica Set ensures that a specified number of pod replicas are running at any given time, providing high availability and fault tolerance for your applications.
So, what happens when a Pod gets destroyed? The Replica Set will automatically create a new Pod to replace the destroyed one, ensuring that the desired number of replicas is maintained. This is crucial for maintaining the availability and reliability of your applications in a Kubernetes cluster.
While Replica Sets describe the desired number of pod replicas, Deployments are a wrapper around Replica Sets that provide additional features such as rolling updates, rollbacks, and scaling. When you create a Deployment, Kubernetes automatically creates a Replica Set to manage the pods associated with that Deployment.
Key Features of Deployments and Replica Sets
The main role of Replica Sets is to:
self-heal: If a pod is destroyed, the Replica Set will create a new one to maintain the desired number of replicas.high availability: Replica Sets ensure the desired number of pod replicas are running at any given time, allowing for horizontal scaling of applications.scaling: Replica Sets allow you to scale your application up or down by adjusting the number of replicas.
For Deployments, the main features are:
manage replica sets: Deployments manage the lifecycle of Replica Sets, allowing you to create, update, and delete them as needed.rolling updates: Deployments allow you to update your application with zero downtime by gradually replacing old pods with new ones.rollbacks: If an update goes wrong, you can easily roll back to a previous version of your application using the Deployment's revision history.scaling: You can easily scale your application up or down by adjusting the number of replicas in the Deployment manifest, and Kubernetes will automatically create or terminate pods to match the desired replica count.
Creating a Deployment
To create a Deployment in Kubernetes, you can use a YAML manifest file that defines the desired state of your application. There is no need to create Replica Sets manually, as Deployments handle that for you. Here's an example of a simple Deployment manifest for a web application:
apiVersion: apps/v1
kind: Deployment
metadata:
  name: my-web-app
# Specifies the desired state of the Deployment
spec:
  replicas: 3
  # The selector field defines how the Deployment finds which Pods to manage. In this case, it looks for Pods with the label app: my-web-app.
  selector:
    matchLabels:
      app: my-web-app
  # The template field defines the desired state of the Pods that will be created by the Deployment. It includes metadata and a specification for the containers that will run in the Pods.
  template:
    metadata:
      # The labels field defines the labels that will be applied to the Pods created by the Deployment. In this case, it sets the label app: my-web-app.
      labels:
        app: my-web-app
    # The spec field defines the specification for the containers that will run in the Pods. In this case, it specifies a single container named my-web-app that uses the image my-web-app:latest and exposes port 80.
    spec:
      containers:
      - name: my-web-app
        image: my-web-app:latest
        ports:
        - containerPort: 80
Adding Probes to a Deployment
As we saw in the previous post, probes are essential for ensuring the health and availability of your applications. You can add liveness and readiness probes to your Deployment manifest to monitor the health of your application containers. Here's an example of how to add probes to the Deployment manifest:
apiVersion: apps/v1
kind: Deployment
metadata:
  name: my-web-app
spec:
  replicas: 3
  selector:
    matchLabels:
      app: my-web-app
  template:
    metadata:
      labels:
        app: my-web-app
    spec:
      containers:
      - name: my-web-app
        image: my-web-app:latest
        ports:
        - containerPort: 80
        # Adding liveness and readiness probes to monitor the health of the application container
        livenessProbe:
          httpGet:
            path: /health
            port: 8080
          initialDelaySeconds: 3
          periodSeconds: 3
          failureThreshold: 3
        readinessProbe:
          httpGet:
            path: /index.html
            port: 8080
          initialDelaySeconds: 3
          periodSeconds: 3
Adding Resource Requests and Limits to a Deployment
To ensure that your application has the necessary resources to run efficiently and to prevent resource contention, you can add resource requests and limits to your Deployment manifest. Resource requests specify the minimum amount of CPU and memory that a container needs to run, while resource limits specify the maximum amount of CPU and memory that a container can use. Here's an example of how to add resource requests and limits to the Deployment manifest:
apiVersion: apps/v1
kind: Deployment
metadata:
  name: my-web-app
spec:
  replicas: 3
  selector:
    matchLabels:
      app: my-web-app
  template:
    metadata:
      labels:
        app: my-web-app
    spec:
      containers:
      - name: my-web-app
        image: my-web-app:latest
        ports:
        - containerPort: 80
        resources:
          # Resource requests specify the minimum amount of CPU and memory that a container needs to run
          requests:
            memory: "64Mi" # 64MB
            cpu: "250m" # 250 millicores (0.25 CPU or 25% of a single CPU core)
          # Resource limits specify the maximum amount of CPU and memory that a container can use
          limits:
            memory: "128Mi" # 128MB
            cpu: "500m" # 500 millicores (0.5 CPU or 50% of a single CPU core)

## Starting a Deployment
To start a Deployment, you can use the `kubectl apply` or `kubectl create` commands with the path to your Deployment manifest file. For example, if your manifest file is named `my-web-app-deployment.yaml`, you can run the following command:

If using `kubectl create`, it will throw an error if the Deployment already exists:

```bash
kubectl create -f my-web-app-deployment.yaml
However, using kubectl apply (the recommended approach), allows you to create the Deployment or update it if it already exists:
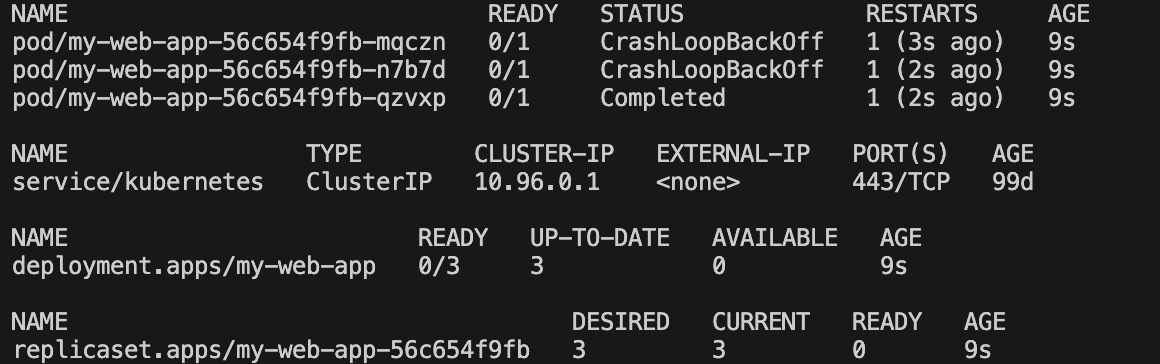
kubectl apply -f my-web-app-deployment.yamlIf now we run the command kubectl get all, we will see the Deployment, Replica Set, and Pods created by the Deployment:
Zero Downtime Deployments
Kubernetes Deployments are designed to provide zero downtime during application updates. When you update a Deployment, Kubernetes will create new pods with the updated configuration while gradually terminating the old pods. This ensures that your application remains available to users during the update process.
There are several strategies for updating a Deployment. The main ones are:
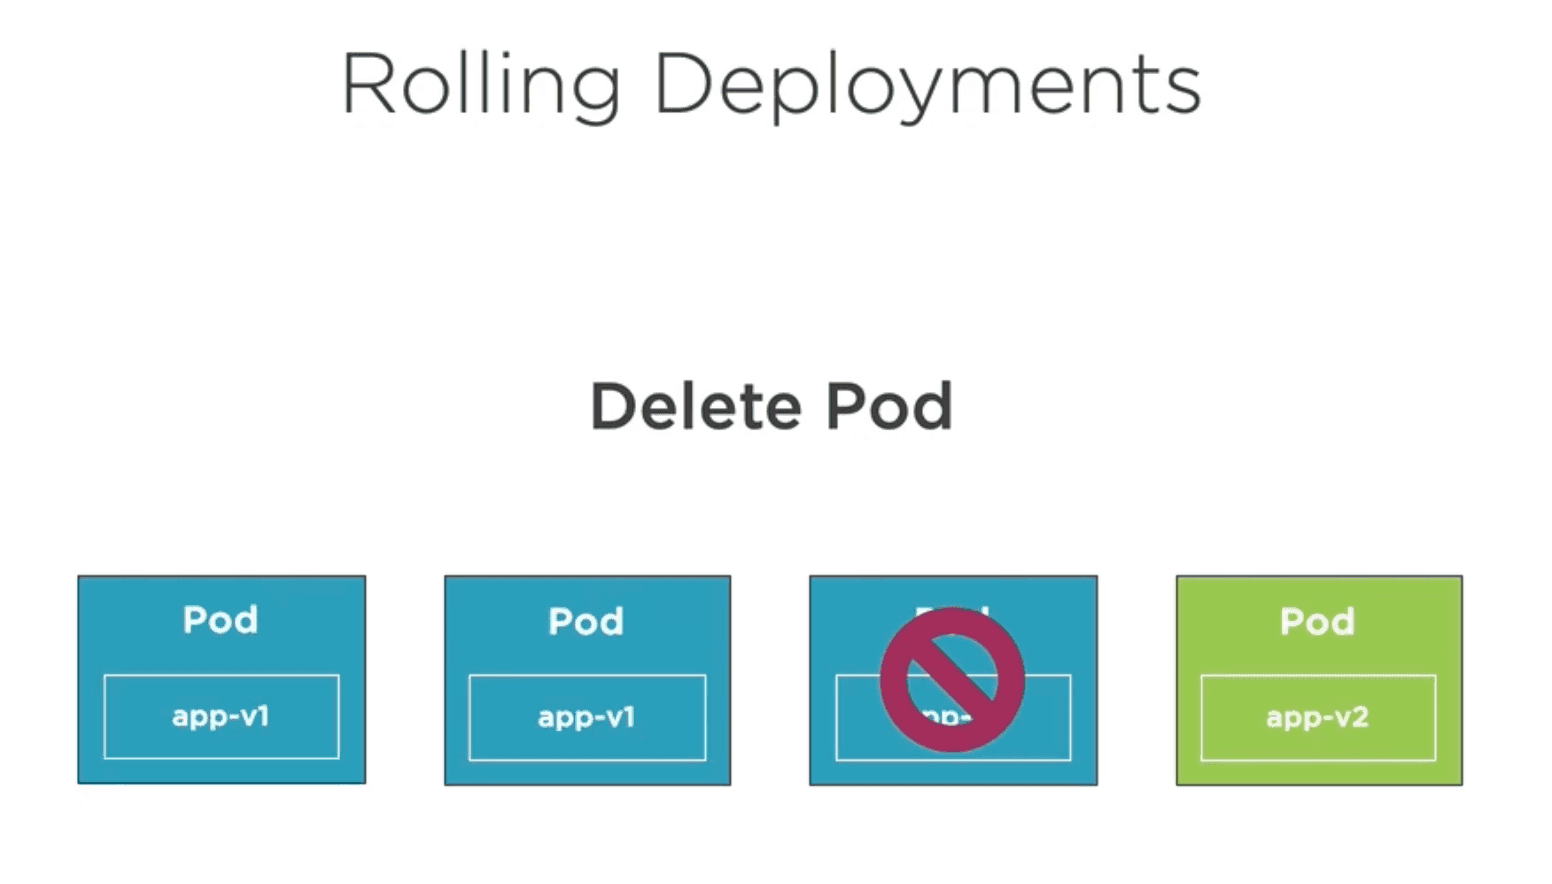
- Rolling Update: This is the default strategy. Kubernetes will gradually replace old pods with new ones, ensuring that a minimum number of pods are always available during the update process. You can configure the rolling update parameters, such as the maximum number of unavailable pods and the maximum number of surge pods, to control the update process.
- Blue-Green Deployment: In this strategy, you create a new version of your application alongside the old version. Once the new version is ready and tested, you can switch traffic to the new version by updating the service to point to the new pods. This approach allows for easy rollbacks if issues arise with the new version.
- Canary Deployment: This strategy involves releasing the new version of your application to a small subset of users first. If the new version performs well and does not introduce any issues, you can gradually increase the number of users accessing the new version. This approach allows you to test the new version in a production environment with minimal risk.
- Rollback: If an update goes wrong, you can easily roll back to a previous version of your application using the Deployment's revision history. Kubernetes keeps track of the previous versions of your Deployment, allowing you to revert to a known good state if needed.
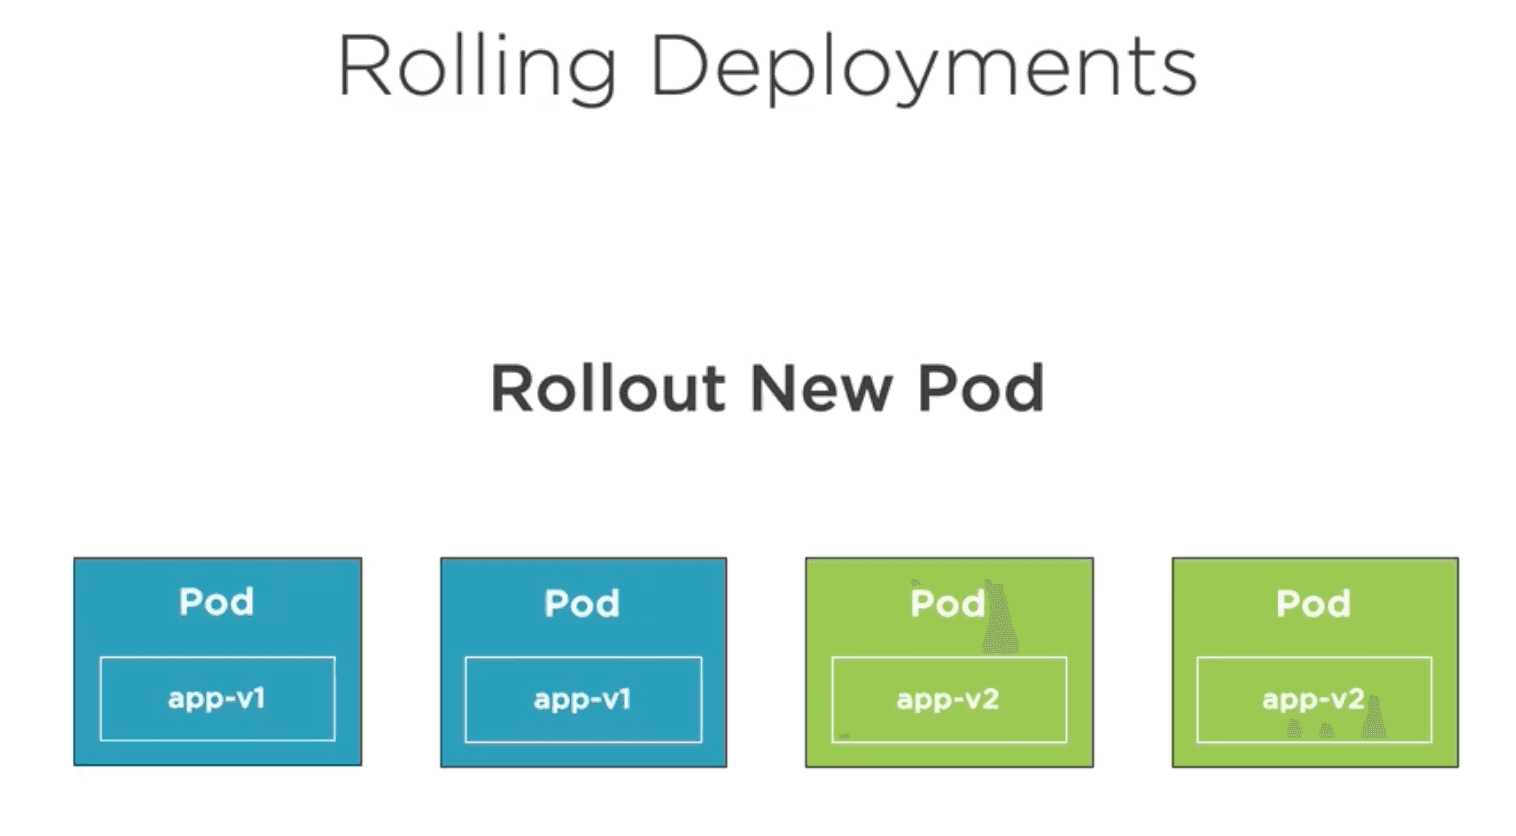
By default, Kubernetes uses the Rolling Update strategy for Deployments. It adds a new Pod for the updated version of the application and gradually scales down the old Pod while scaling up the new one. This ensures that there is no downtime during the update process.

Other commands to manage Deployments
You can also use the following commands to manage your Deployments:
- List the Deployments in your cluster:
# List all Deployments in the current namespace
kubectl get deployments
# List all Deployments showing their labels
kubectl get deployments --show-labels
# List all Deployments with a specific label
kubectl get deployments -l app=my-web-app- Describe a specific Deployment to see detailed information about it:
kubectl describe deployment my-web-app- Scale a Deployment to change the number of replicas:
# Scale the Deployment to 5 replicas by deployment name
kubectl scale deployment my-web-app --replicas=5
# Scale the Deployment to 2 replicas using the manifest file
kubectl scale -f my-web-app-deployment.yaml --replicas=5- Delete a Deployment:
# Delete the Deployment by name
kubectl delete deployment my-web-app
# Delete the Deployment using the manifest file
kubectl delete deployment -f my-web-app-deployment.yaml